Hands-on: from one sentence to an API — a London System Agent walkthrough
This is a hands-on guide for anyone opening the London System Agent studio for the first time. We'll go around the full loop — compile a one-sentence requirement into a graph, validate it for free, pass evaluation, and call the same agent over an API.
Before you start
There's nothing to install. Open the studio in a browser and you're ready. Before diving in, it helps to understand the two execution modes.
Stub mode returns dummy responses without calling any LLM, validating graph structure, branching, and loop termination for free. Real mode calls live models through your configured provider keys (BYOK), within prepaid credits and a budget cap. The default money-saving strategy: iterate for free in Stub while shaping structure, and switch to Real only when you need to check quality.
Sign in with a Google account. Signing in defaults you to Real mode and grants a small one-time signup credit, so you can try a Real run without paying. If you only want to validate structure quickly, switch execution mode to Stub in Settings and iterate for free.
Step 1 — compile a graph from one sentence
Open the studio and describe the agent you want in a single sentence — e.g., “Take a topic, gather evidence from the web, search more if sources are thin, then summarize with citations.” Send the first message and the requirement compiles into a graph (GraphIR).
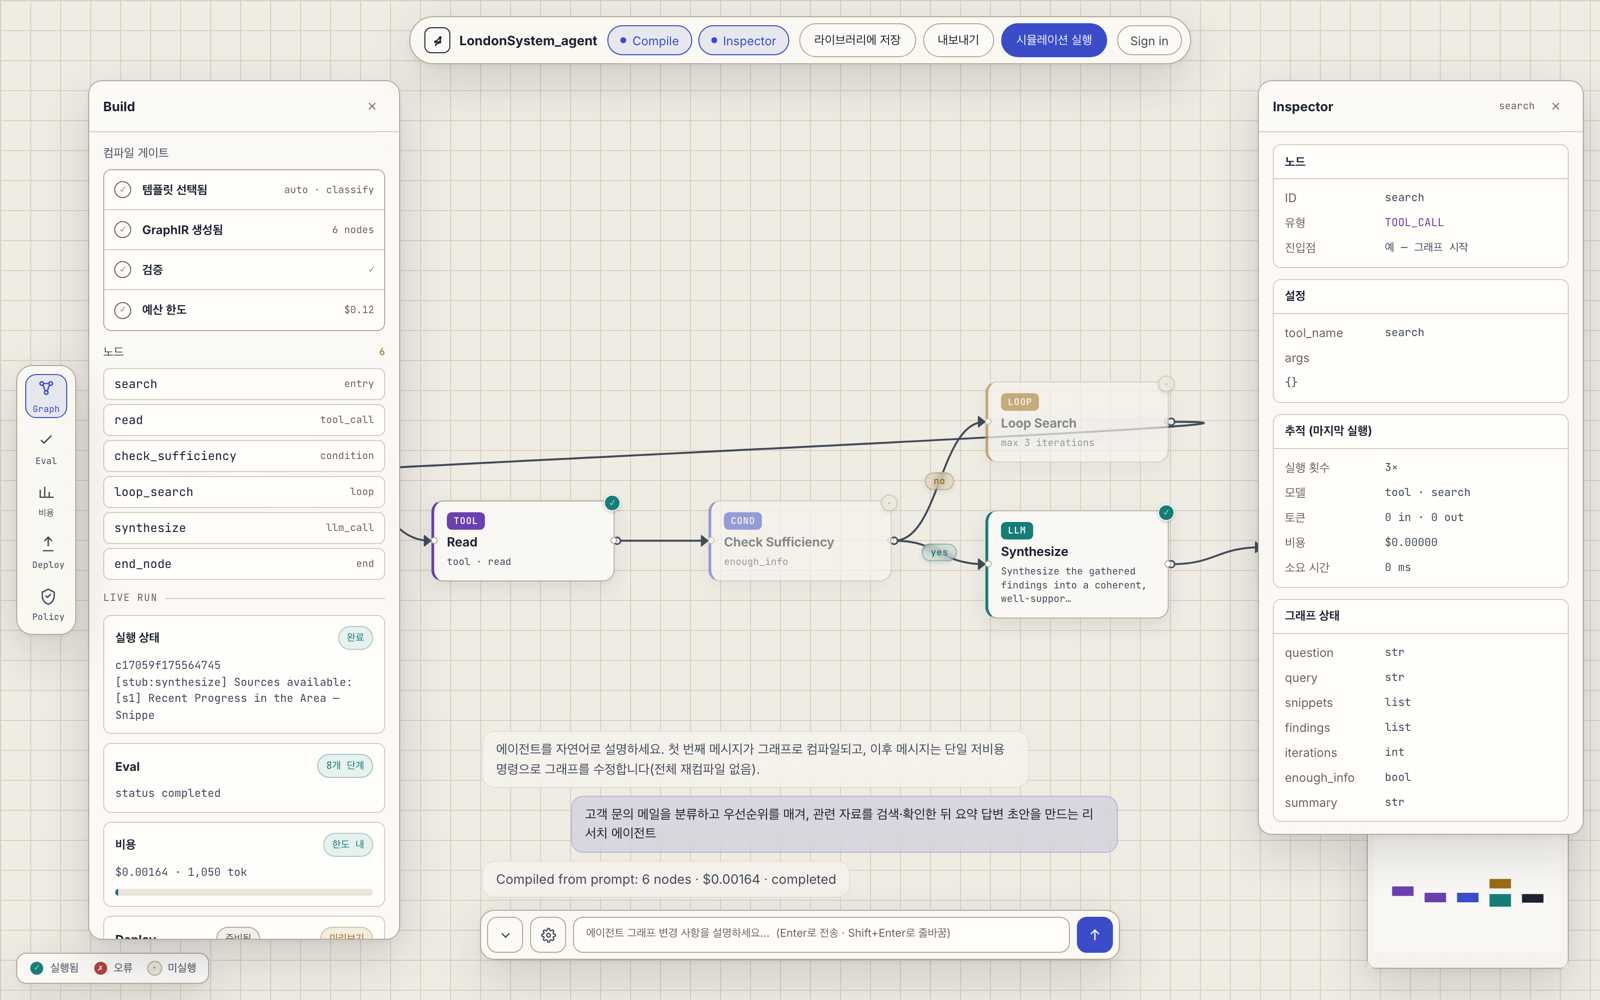
Compilation streams in, with nodes appearing on the canvas one at a time. Below is a one-sentence compile: six nodes — search, read, condition, loop, synthesis, end — generated and executed, with per-step cost and a completed status shown alongside.
The point of this step is that you get a structure, not a long prompt. What it searches, when it searches more, and where it stops are visible as nodes and edges — so all later debugging, cost tracking, and evaluation happen on top of this graph.
Step 2 — how to read the graph
Each node owns one responsibility: TOOL_CALL invokes a tool (e.g., search), CONDITION branches, LOOP repeats with a termination condition, LLM_CALL is model reasoning, and END terminates. Edges show where data flows from and to.
Nodes can be dragged to reposition, and the layout persists. Right after compilation, structural properties are checked automatically — a single entry point, no unreachable nodes, loops with a termination condition. Plausible-but-broken graphs are caught here.
Step 3 — refine via chat
If the graph isn't right, send one edit instruction at a time in chat — e.g., “Make it gather at least three sources.” Refinement sends the current IR plus one new instruction to the model and regenerates the full modified IR.
A caveat: in beta, refinement is not direct node editing in the UI — the LLM returns a complete IR. The result must pass validation; a failed refinement preserves the existing graph and suggests a safer alternative. The original run is preserved and the refinement is recorded as a new run.
Step 4 — run it for free in Stub and read the cost
Once the structure settles, run it in Stub mode first. With no LLM calls, you can confirm that branching, loop termination, and node wiring run to the end without any token cost.
After a run, the cost panel shows per-step input/output tokens and spend, and the same status (ok ✓, error ✗, not run ·) is overlaid on the canvas graph. You can point at the exact node where execution stopped or cost accrued. The pricing table uses approximate public list prices, so treat it as an optimization aid and budget alarm, not a 1:1 invoice ledger.
Step 5 — run the pre-deploy evaluation gate
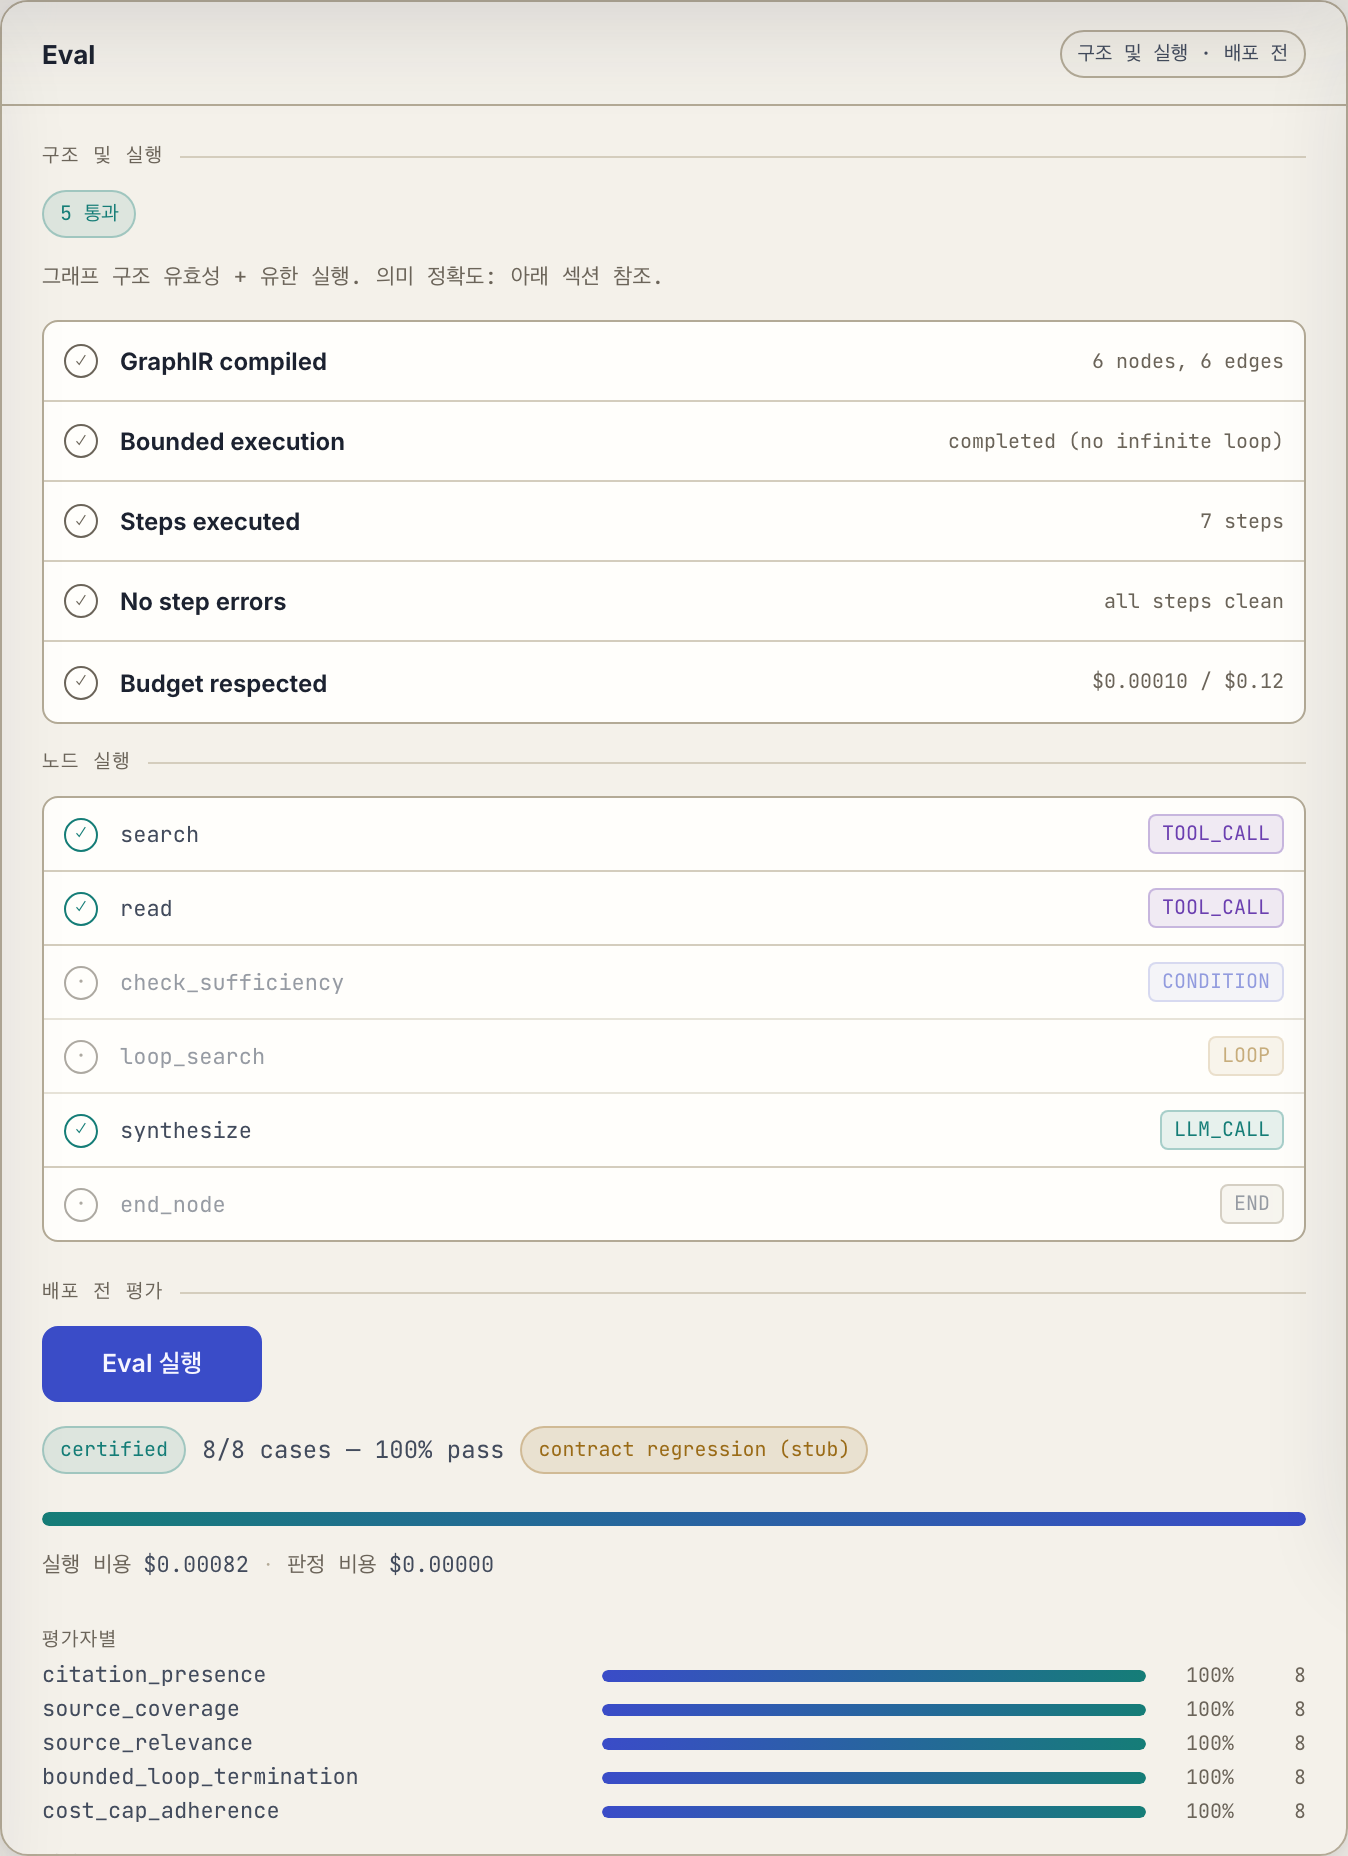
“It finished” is not “it's correct.” The Eval panel splits these into two layers. Layer 1 is five deterministic structure/execution checks — compiled, bounded termination, steps executed, no step errors, budget respected — that resolve immediately after compilation.
Layer 2 runs the agent against the template's golden dataset and scores it. Four templates — research, document, branch, simple — ship datasets, and per case the evaluators check citation presence, source coverage, loop termination, budget adherence, and more. Below is the real Eval panel with the research template's 8 cases all passing (certified).
Honesty guard: a Stub report is labeled “contract regression.” With no LLM calls it deterministically regression-tests structure and contract only — it does not claim model answer quality. The judge evaluators that score meaning (groundedness, answer_relevance) run in Real mode only.
Step 6 — switch to Real mode
Now check quality for real. Switch execution mode to Real in Settings and it calls live APIs through your configured provider credentials (Vertex AI, OpenAI, Anthropic). Signed-in users can spend the one-time signup credit to try a Real run without paying.
Set a budget cap and the runtime ledger accumulates cost step by step, stopping a run that exceeds it. Real-mode gates re-check balance before each run, so exhausted credits stop further provider calls. The runaway-spend guard lives inside the execution path itself.
Step 7 — save it and call it over an API
When the graph is good, save it to the library and issue a platform API key in Settings. The key is shown in plaintext only once at issuance and the server never stores the plaintext, so save it safely right then.
Call the saved agent through the /v1/runs endpoint. Send input with your key in the header and the same IR you saw in the studio runs on the server, returning the result, cost, and status. The “Deployment blocked” banner on a gate failure is a visualization, not hard enforcement yet — so in beta, review eval_id, run_id, ir_hash, and the gate verdict before promoting a graph.
Recap — the loop at a glance
One sentence → compile a graph → read the graph → refine via chat → free Stub run → evaluation gate → switch to Real → save and API. Because every step builds on the same IR, you can trace what happened, where, and why — all the way through.
Start with workflows that have clear verification criteria — document processing and research. Their structure is simple and a golden dataset is ready, so you'll get through a full loop to evaluation the fastest.
Your turn to build
Compile your first agent graph from a single sentence.